And here's the instructions to hatch the eggs embroidered . I normally use white eggs I buy direct from a farm, are the eggs of chickens living free in the yard, I call them the eggs from happy hens.
In this case I used an egg "normal" in a sad chicken battery, but the procedure is identical.
needed: CHICKEN EGGS OR PAPER, GEL CONTOUR decoupage, DRILLING FOR MODEL GRIND WITH TIPS, BLEACH, A GLASS AND A PLASTIC SPOON, SATIN TAPE ABOUT A cm high, a pencil.
This is my drill:

The drills have a device that regulates the number of revolutions per second. I keep it on the number 3 and I feel good.

Now we need to take our bell'ovetto

identified by eye and the highest point and center and make a dot with a pencil.


Do the same with the bottom. Preoccupatesi not stamp on the shell eggs that have all the industry, will go away with bleach.

now proceed with great delicacy, but the decision and make the hole higher (must be done with two hands, I I had a commitment with the camera).


Turn the egg by tapping with the index of the upper hole to prevent leakage of albumen


We sense the CUTICLE 's internal egg, but do not worry, it will go away after a dip in bleach.
Now you need to empty the shell. The fastest and easiest way is to give a strong tip in the egg so that the contents come out.
But if you are constantly busy, like me, yolks and whites separately to mount, not want to scare us from the need to keep the shell intact?
So the following procedure is a bit obsessive ... but that is enough to take a look at my cakes ... it soon becomes clear that I do not like things simple, it is plain for everyone!
Flip the egg and dump the egg white, also blowing gently (placing his lips on the opposite hole). Released before the most dense albumen.

Put the egg in a vertical position


and then lower it again.


You will notice that the album that comes out is more liquid. Repeat the last two steps PIU ' times, until it comes out more egg white.
It should do a little movement that you do when you put salt on a dish with a salt.
At one point form the basis of the chalazion, the and two structures that keep the yolk in the center

It should do a little movement that you do when you put salt on a dish with a salt.
At one point form the basis of the chalazion, the and two structures that keep the yolk in the center

detach the help of a knife.
When there's egg, the yolk is the time.

When there's egg, the yolk is the time.

must position itself to another container and blow in 'egg firmly.
Now dip the shell eventually empty into a glass of bleach, trying to "drown" for good, so it is full of bleach and slowly submerged ruins everything.

Now dip the shell eventually empty into a glass of bleach, trying to "drown" for good, so it is full of bleach and slowly submerged ruins everything.

You will notice that in a few seconds, the foam will begin to appear, is the internal cuticle is dissolved. 

Leave the egg immersed for 10-15 minutes, move from time to time, until the foam disappears and you will see the hole without cuticles.


At this point remove the egg from the bleach, rinse well and allow to dry, preferably in the sun.
Now with a pencil to mark the points which will then drilled.
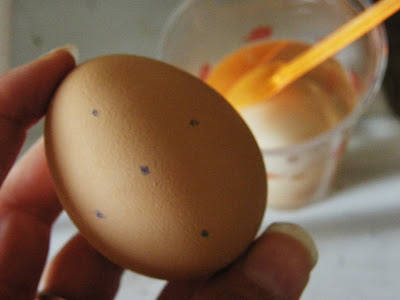
Now with a pencil to mark the points which will then drilled.

not place the holes too close together otherwise the shell will become even more fragile and the likelihood of rupture increases. Carefully proceed with drilling, operation a bit long and requires a lot of quiet and attention.
He recommended me to keep in hand while HOLLOW SHELL , because in this way, the arm and amortises absorb all the stresses of the drill and the hole will be perfect, without chipping. If you put the shell on a hard surface, most likely it will break just to operate the drill.
When the holes are completed you can decorate the shell with a contour gel.


When the gel is dry, take the tape and it is passed, shot to double, from side to side, then a slow link to the extremities lower.
I tested a product called Fun Liner Magic of Marabou, is provided in stationery stores or DIY. It 's a gel that when dry,
I tested a product called Fun Liner Magic of Marabou, is provided in stationery stores or DIY. It 's a gel that when dry,

brought to a temperature high enough (with the hair drier or oven), it swells and I got this effect:
.JPG)
And here's the my favorite is a duck egg.

now all on the nest! I believe that on the Christmas tree, some bell'ovetto embroidered and decorated with red ribbon mica would hurt us?
.JPG)
.JPG)


.JPG)


